


A pristine driveway does more than boost the curb appeal of your home. It ensures a smooth ride and prevents vehicle wear. Over time, exposure to fluctuating temperatures, heavy vehicles, and moisture causes surfaces to fracture. Ignoring these minor imperfections can lead to severe structural failure, eventually requiring an expensive replacement.
Fortunately, addressing small fissures is a manageable weekend project. By tackling the damage early, you protect your investment and extend the lifespan of your pavement. This guide provides a straightforward method to restore your driveway to its former glory.
Assessing the Damage
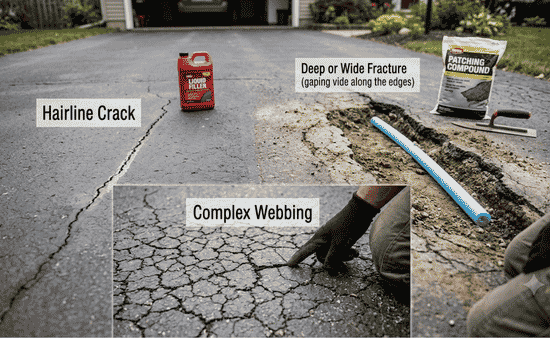
Before gathering your tools, examine the condition of the pavement. Not all fractures are equal, and different types require distinct solutions.
Hairline Cracks
Narrow gaps measuring less than a quarter-inch wide are mostly cosmetic. These are the easiest to manage and usually require a simple liquid filler or pourable sealant.
Deep or Wide Fractures
Gaps wider than a quarter-inch signify structural movement or erosion underneath the surface. These require a sturdier compound, such as a textured patching gel or a foam backer rod, to support the filler material.
Complex Webbing
If the surface resembles an alligator skin pattern, the base layer has likely failed. While temporary patches might help, this level of deterioration often means a professional resurfacing or total replacement is necessary.
Essential Tools and Materials
Having the correct gear ensures a durable repair that withstands the elements. Gather these items before beginning:
- Protective eyewear and heavy-duty gloves
- A stiff-bristle wire brush or a broom
- Screwdriver or chisel
- High-pressure garden hose or a pressure washer
- Pourable driveway sealant or flexible patching compound
- Trowel or putty knife
- Foam backer rods for deep gaps
Step-by-Step Repair Process
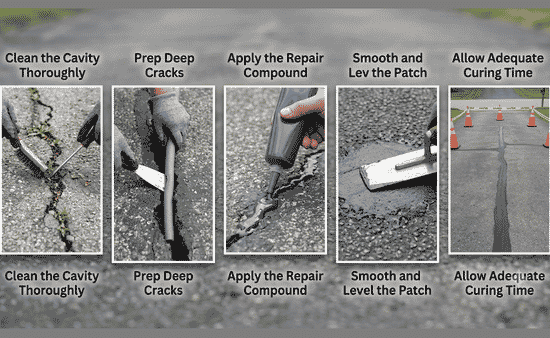
Achieving a professional result depends heavily on preparation. Follow these stages to ensure the sealant adheres properly and lasts for years.
1. Clean the Cavity Thoroughly
Debris, dirt, and weeds prevent the patching compound from bonding with the old pavement. Use a screwdriver, chisel, or wire brush to scrape out any vegetation, loose rocks, and crumbling debris from inside the gap.
Once the loose material is dislodged, sweep the entire area. Next, use a pressure washer or a high-pressure hose nozzle to blast away remaining dust and dirt. Allow the area to dry completely. Applying sealant to a wet surface traps moisture underneath, which causes the patch to fail quickly.
2. Prep Deep Cracks
If a fracture is deeper than a half-inch, filling it entirely with liquid sealant is inefficient and costly. The liquid will sag and shrink as it cures. Instead, pack the gap with a foam backer rod or clean sand until the depth is roughly a quarter-inch from the surface. Press the rod down firmly with a putty knife so it creates a solid foundation.
3. Apply the Repair Compound
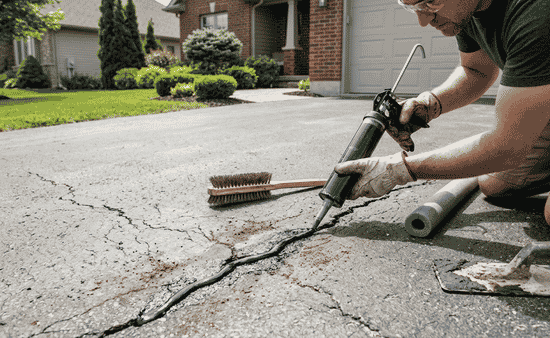
For thin cracks, snip the tip of the sealant bottle to match the width of the gap. Insert the nozzle directly into the fracture and squeeze the container, filling the space from the bottom up. Fill the opening until the liquid sits slightly higher than the surrounding pavement, as most products shrink a bit during the drying phase.
Paying attention to these small details helps extend the life of paved surfaces and reflects the same proactive mindset found in essential new home construction tips, where using quality materials and addressing minor issues early can prevent costly repairs and preserve long-term structural integrity.
For wider gaps, apply a thicker patching compound using a trowel. Press the material firmly into the space to eliminate air pockets.
4. Smooth and Level the Patch
Take a putty knife, trowel, or gloved finger to smooth out the top of the filler. Scraping away excess material ensures the patch sits flush with the rest of the driveway. A level surface prevents snowplows or tires from catching on the patch later. Clean up any accidental spills on the undamaged sections of the driveway immediately before the product cures.
5. Allow Adequate Curing Time
Keep vehicles and foot traffic off the repaired area for at least twenty-four to forty-eight hours. Check the manufacturer’s guidelines on your specific product for precise drying times, as humidity and temperature alter the curing speed.
Long-Term Maintenance
Once the repairs are complete, protect your hard work. Applying a high-quality sealant over the entire driveway every few years seals out water and shields the surface from ultraviolet rays. Keeping the pavement clean and addressing new imperfections immediately prevents minor flaws from turning into major headaches. Whether you are managing seasonal wear or performing specialized asphalt crack repair in Utah, consistent maintenance is the secret to a long-lasting driveway.